Vue+Element-U實(shí)現(xiàn)分頁顯示效果
本文實(shí)例為大家分享了Vue+Element-U實(shí)現(xiàn)分頁顯示效果的具體代碼,供大家參考,具體內(nèi)容如下
當(dāng)我們從后端返回的數(shù)據(jù)量很大,并且根據(jù)需求我們需要將返回的數(shù)據(jù)全部都顯示在頁面中,默認(rèn)情況下會(huì)把所有的數(shù)據(jù)全部顯示在一個(gè)頁面,這樣非常影響視覺和頁面的使用,所以需要使用分頁我這次使用的是Vue4.0 + Element-UI組件,Element-UI庫非常的豐富,它提供了一個(gè)分頁組件 Pagination
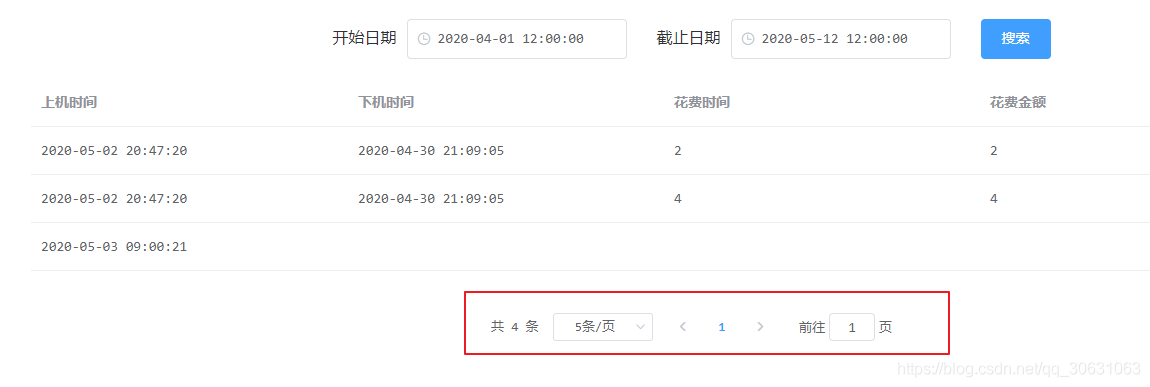
展示效果:這個(gè)是獲取兩個(gè)時(shí)間段的上機(jī)記錄
HTML部分:
<el-card> <div class='block'> <span style='left:-100px; position:relative'> <span style=’margin-right:10px’> 開始日期 </span> <el-date-picker v-model='value1' type='datetime' placeholder='選擇日期' format='yyyy-MM-dd HH:mm:ss' value-format='yyyy-MM-dd hh:mm:ss'> </el-date-picker> </span> <span style='left:-70px; position:relative'> <span style=’margin-right:10px’> 截止日期</span> <el-date-picker v-model='value2' type='datetime' placeholder='選擇日期' value-format='yyyy-MM-dd HH:mm:ss' format='yyyy-MM-dd hh:mm:ss'> </el-date-picker> </span> <el-button type='primary' @click='lineCrodList'> 搜索 </el-button> </div> <el-table :data='lineData' style='width: 80%;left:60px;top:20px'> <el-table-column prop='onTime' label='上機(jī)時(shí)間'> </el-table-column> <el-table-column prop='downTime' label='下機(jī)時(shí)間'> </el-table-column> <el-table-column prop='spendCash' label='花費(fèi)時(shí)間'> </el-table-column> <el-table-column prop='spendCash' label='花費(fèi)金額'> </el-table-column> </el-table> <el-pagination @size-change='handleSizeChange' @current-change='handleCurrentChange' :current-page='currentPage' :page-sizes='[1, 2, 5, 10]' :page-size='pageSize' layout='total, sizes, prev, pager, next, jumper' :total='total'> </el-pagination> </el-card>
分頁控件的代碼如下:
<el-pagination @size-change='handleSizeChange' @current-change='handleCurrentChange' :current-page='currentPage' :page-sizes='[1, 2, 5, 10]' :page-size='pageSize' layout='total, sizes, prev, pager, next, jumper' :total='total'></el-pagination>
解析:
@size-change:這個(gè)是一個(gè)方法,當(dāng)在頁面改變每頁顯示的條數(shù)時(shí),會(huì)觸發(fā)該方法

@current-change:點(diǎn)擊當(dāng)前頁改變的時(shí)候會(huì)觸發(fā)該方法

:current-page:當(dāng)前頁數(shù)
:page-sizes:個(gè)數(shù)選擇器的選項(xiàng)設(shè)置

:page-size:每頁顯示的條數(shù)
:total:總數(shù)據(jù)數(shù)量
JS代碼:
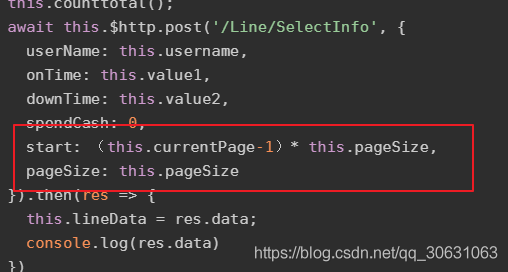
<script>export default { data () { return { value1: ’’, value2: ’’, lineData: [], username: ’’, total: 0, //實(shí)現(xiàn)動(dòng)態(tài)綁定 pageSize: 2, currentPage: 1, } }, methods: { //當(dāng)改變每頁顯示條數(shù)的選擇器時(shí)會(huì)觸發(fā)的事件 handleSizeChange (size) { // 每頁顯示的數(shù)量是我們選擇器選中的值size this.pageSize = size; console.log(this.pageSize);//每頁下拉顯示數(shù)據(jù) this.lineCrodList(); },//當(dāng)改變當(dāng)前頁數(shù)的時(shí)候觸發(fā)的事件 handleCurrentChange (currentPage) { this.currentPage = currentPage; console.log(this.currentPage);//點(diǎn)擊第幾頁 this.lineCrodList(); },//獲取用戶上機(jī)記錄的信息分頁 async lineCrodList () { //調(diào)用 獲取total數(shù)據(jù)的方法 this.counttotal(); await this.$http.post(’/Line/SelectInfo’, { userName: this.username, onTime: this.value1, downTime: this.value2, spendCash: 0, start: (this.currentPage-1)* this.pageSize, pageSize: this.pageSize }).then(res => { this.lineData = res.data; console.log(res.data) }) }, //獲取用戶總條數(shù) async counttotal () { await this.$http.post(’/Line/selectTotal’, { userName: this.username, onTime: this.value1, downTime: this.value2, }).then(res => { this.total = res.data; })}
我們前端請(qǐng)求的時(shí)候需要給后端發(fā)送start 和 pageSize 這兩個(gè)參數(shù) 因?yàn)榫唧w的數(shù)據(jù)是后端通過數(shù)據(jù)庫來搜索的
后臺(tái)Sql語句,其他層的代碼我就不在這里列出
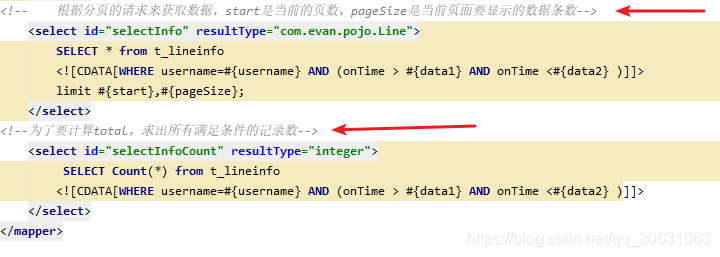
可以看到 limit i,n
i:表示查詢結(jié)果的索引值
n:為查詢結(jié)果的返回?cái)?shù)量
i 和 n之間用逗號(hào)分隔
例子:
#分頁顯示新聞數(shù)據(jù),每頁顯示兩條,這里顯示第一頁SELECT id,title,author,createdate FROM news_detail LIMIT 0,2#分頁顯示新聞數(shù)據(jù),每頁顯示兩條,這里顯示第二頁SELECT id,title,author,createdate FROM news_detail LIMIT 2,2#分頁顯示新聞數(shù)據(jù),每頁顯示兩條,這里顯示第三頁SELECT id,title,author,createdate FROM news_detail LIMIT 4,2#公用的分頁sql#第二個(gè)數(shù):分頁后每頁顯示幾條新聞(頁面容量) pageSize#第一個(gè)數(shù):從第幾條數(shù)據(jù)開始顯示(當(dāng)前頁碼pageNo-1)*pageSizeSELECT id,title,author,createdate FROM news_detail LIMIT (pageNo-1)*pageSize,pageSize
我把(pageNo-1)*pageSize 寫到了前端,所以就無需在后端重復(fù)寫
# 查詢8條數(shù)據(jù),索引從5到12,第6條記錄到第13條記錄 select * from t_user limit 5,8;
以上就是本文的全部?jī)?nèi)容,希望對(duì)大家的學(xué)習(xí)有所幫助,也希望大家多多支持好吧啦網(wǎng)。
相關(guān)文章:
1. idea刪除項(xiàng)目的操作方法2. IntelliJ IDEA配置Tomcat服務(wù)器的方法3. IntelliJ IDEA恢復(fù)刪除文件的方法4. IntelliJ IDEA設(shè)置默認(rèn)瀏覽器的方法5. 使用Maven 搭建 Spring MVC 本地部署Tomcat的詳細(xì)教程6. docker鏡像完全卸載的操作步驟7. IntelliJ IDEA導(dǎo)入jar包的方法8. Docker 部署 Prometheus的安裝詳細(xì)教程9. idea導(dǎo)入maven項(xiàng)目的方法10. idea重置默認(rèn)配置的方法步驟

 網(wǎng)公網(wǎng)安備