Android Studio 創(chuàng)建自定義控件的方法
我們知道,當(dāng)系統(tǒng)控件并不能滿足我們的需求時(shí),我們就需要來(lái)創(chuàng)建自定義控件,主要有兩種方法
(1)引入布局
下面來(lái)自定義一個(gè)控件,iPhone的標(biāo)題欄,創(chuàng)建一個(gè)標(biāo)題欄并不是什么難事,加入兩個(gè)button一個(gè)TextView就行了,可是在我們的應(yīng)用中,有很多頁(yè)面都是需要這樣的標(biāo)題欄,我們不可能每個(gè)活動(dòng)都寫(xiě)一遍布局,這個(gè)時(shí)候我們就可以用引用布局的方法,新建一個(gè)title.xml
<?xml version='1.0' encoding='utf-8'?><LinearLayout xmlns:android='http://schemas.android.com/apk/res/android' android:layout_width='match_parent' android:layout_height='wrap_content' android:background='#817D7D' > <Button android: android:layout_width='wrap_content' android:layout_height='wrap_content' android:layout_gravity='center' android:layout_margin='5dp' android:text='back' android:textColor='#fff'/> <TextView android: android:layout_width='0dp' android:layout_height='wrap_content' android:layout_gravity='center' android:layout_weight='1' android:gravity='center' android:textColor='#c0c0c0' android:textSize='24sp' android:text='title text' /> <Button android: android:layout_width='wrap_content' android:layout_height='wrap_content' android:layout_gravity='center' android:layout_margin='5dp' android:textColor='#fff' android:text='edit' /></LinearLayout>
現(xiàn)在標(biāo)題欄已經(jīng)寫(xiě)好了,接下來(lái)就要在程序中使用,修改activity_main.xml
<?xml version='1.0' encoding='utf-8'?><LinearLayout xmlns:android='http://schemas.android.com/apk/res/android' android:layout_width='match_parent' android:layout_height='match_parent' > <include layout='@layout/title'/></LinearLayout>
我們只要通過(guò)一句include語(yǔ)句引進(jìn)來(lái)就行了
<include layout='@layout/title'/>
最后我們需要在MainActivity中將系統(tǒng)自帶的標(biāo)題欄屏蔽
package com.example.ch03;import android.drm.DrmStore;import android.support.v7.app.ActionBar;import android.support.v7.app.AppCompatActivity;import android.os.Bundle;public class MainActivity extends AppCompatActivity { @Override protected void onCreate(Bundle savedInstanceState) { super.onCreate(savedInstanceState); setContentView(R.layout.activity_main); //屏蔽系統(tǒng)自帶狀態(tài)欄 ActionBar actionBar = getSupportActionBar(); if(actionBar != null){ actionBar.hide(); } }}
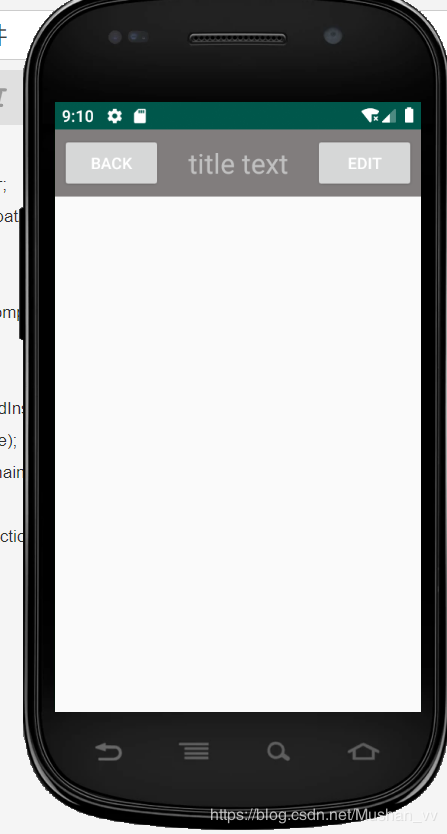
最后來(lái)看一下效果
(2)注冊(cè)點(diǎn)擊事件
在上面我們看到,每個(gè)界面的返回按鈕功能都是一樣的,即銷毀當(dāng)前活動(dòng),我們不可能在每個(gè)活動(dòng)中都重新注冊(cè),所以使用自定義控件的方式來(lái)解決新建TitleLayout,成為標(biāo)題欄控件
public class TitleLayout extends LinearLayout {public TitleLayout(Context context, AttributeSet attrs){ super(context,attrs); LayoutInflater.from(context).inflate(R.layout.title,this);
我們重寫(xiě)了LinearLayout中帶參數(shù)的構(gòu)造函數(shù),引入TitleLayout控件就會(huì)調(diào)用這個(gè)構(gòu)造函數(shù),然后對(duì)標(biāo)題欄進(jìn)行動(dòng)態(tài)加載,就需要借助LayoutInflater實(shí)現(xiàn)。通過(guò)LayoutInflater的from方法構(gòu)建一個(gè)LayoutInflater對(duì)象,調(diào)用inflate()方法動(dòng)態(tài)加載一個(gè)布局文件
然后在布局文件中添加自定義控件,修改activity_main.xml
<?xml version='1.0' encoding='utf-8'?><LinearLayout xmlns:android='http://schemas.android.com/apk/res/android' android:layout_width='match_parent' android:layout_height='match_parent' ><com.example.ch03.TitleLayout android:layout_width='match_parent' android:layout_height='wrap_content'/></LinearLayout>
重新運(yùn)行一下,效果是一樣的
下面來(lái)給按鈕注冊(cè)點(diǎn)擊事件,修改TitleLayout中的代碼
package com.example.ch03;import android.app.Activity;import android.content.Context;import android.util.AttributeSet;import android.view.LayoutInflater;import android.view.View;import android.widget.Button;import android.widget.LinearLayout;import android.widget.Toast;public class TitleLayout extends LinearLayout {public TitleLayout(Context context, AttributeSet attrs){ super(context,attrs); LayoutInflater.from(context).inflate(R.layout.title,this); Button titleBack = findViewById(R.id.title_back); Button titleEdit = findViewById(R.id.title_edit); titleBack.setOnClickListener(new OnClickListener() { @Override public void onClick(View v) { ((Activity) getContext()).finish(); } }); titleEdit.setOnClickListener(new OnClickListener() { @Override public void onClick(View v) { Toast.makeText(getContext(),'You click edit button', Toast.LENGTH_LONG).show(); } });}}
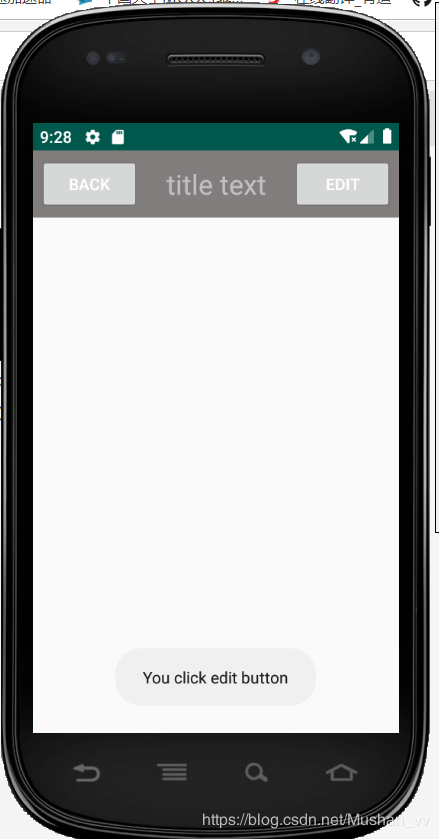
重新運(yùn)行一下,然后點(diǎn)擊edit按鈕
到此這篇關(guān)于Android Studio 創(chuàng)建自定義控件的方法的文章就介紹到這了,更多相關(guān)Android Studio自定義控件內(nèi)容請(qǐng)搜索好吧啦網(wǎng)以前的文章或繼續(xù)瀏覽下面的相關(guān)文章希望大家以后多多支持好吧啦網(wǎng)!
相關(guān)文章:
1. IntelliJ IDEA安裝插件的方法步驟2. idea導(dǎo)入maven項(xiàng)目的方法3. Docker 部署 Prometheus的安裝詳細(xì)教程4. IntelliJ IDEA設(shè)置自動(dòng)提示功能快捷鍵的方法5. 通過(guò)Django Admin+HttpRunner1.5.6實(shí)現(xiàn)簡(jiǎn)易接口測(cè)試平臺(tái)6. idea重置默認(rèn)配置的方法步驟7. IntelliJ IDEA調(diào)整字體大小的方法8. idea設(shè)置代碼格式化的方法步驟9. idea給項(xiàng)目打war包的方法步驟10. IntelliJ IDEA設(shè)置背景圖片的方法步驟
 網(wǎng)公網(wǎng)安備